Every Bronco NEEDS this …
Tuffy Tailgate Table

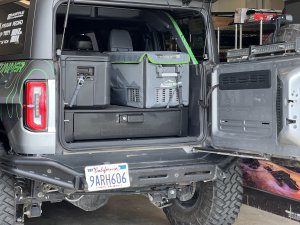
What is up weekenders I’m Corbin. We’re overhauling my trunk. My trunk hasn’t really gotten a lot of attention. You can tell I just kind of throw stuff in here. I literally just have a mat, cover and that’s about it. I want to redo it and luckily my friends over at Tuffy have some solutions for that.

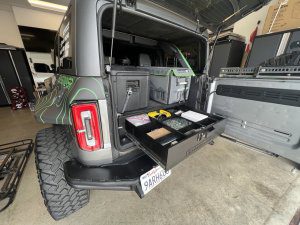
Today, we’re actually going to tackle the tailgate. We’re going to put a tailgate table there. I think I need a table. I do a lot of camping and repairs Off-road, so, I think a little table would be kind of rad. We’re going to check out the Tuffy tailgate table and get that guy installed. Let’s tackle this.

Unboxing

Here’s everything that comes with the kit. It’s pretty self-explanatory. It comes with very detailed instructions, a little top frame, the actual frame for the table the table itself, a bunch of hardware, a drill bit because this is going to require you to drill into your body so it is a little bit permanent. They do provide the drill bit you are going to need a drill and an allen key for some of these bolts. Then they provide all the little rubber washers and everything that you’re going to need.

Installation

Get these panels on and actually drill some holes so that we can get those rib nuts going. The table’s rated for 25 lbs. which seems like it could be pretty good. That’s enough for you know any kind of grill or tools that you want to put on here camping and stuff. I think it’s pretty good. It seems pretty quality and does have holes in it for Molle, so when it’s actually closed you could have Molle bags and whatnot attached to it. Pretty decent little quality clamps which is nice to see.

Anyways, let’s get these panels on. We’re going to pull off the panel so you’re just going to want to pull it from the bottom and there’s actually full tabs. It’s kind of violent but yeah you pull from the bottom. It kind of lifts out. It has these tabs I’ve already broken a bunch , so don’t do that! Pull it from the bottom. Once you have this plastic piece off you’re actually going to grab some of these rubber grommets or bushings whatever you want to call them, that come with a kit and you’re going to go ahead you’re going to put them into the top four slots. You’re actually going to have them facing the top of the holes and then these bigger ones are going to go on these larger slit or openings down at the bottom. Those are going to go on the bottom of the hole.

Once you have those little rubber bushings on there you’re going to grab this top piece and you see it actually has some tabs. Those tabs are just going to slide into those holes up top. It should just fit in. A nice snug fit nice very nice. Then you’re going to go ahead and grab the outer frame. The outer frame does have more hooks at the bottom. Those are going to go in the larger holes on the bottom. It does have one side that’s not attached. Don’t worry about that, that’s how it’s supposed to be. One side has a rivet and this will get bolted down after the fact but we’re going to go ahead you’re just going to slide this in and get it lined up with the top bracket.

You’ll see that there are some holes along here that it’s going to line up with this bracket, with the two brackets that’s actually going to bolt together along with two holes out here on the side. You’re going to go ahead and find the three screws that are going to go up top here. Then you’ll have two that will go on either side with the nut.

Okay, now that this is loosely put on with the hardware just kind of sitting in there you don’t need to go ahead and fully tighten it down ‘cuz we’re actually going to be taking this apart. You’re going to go ahead and we’re actually just going to go ahead and mark the holes now. Make sure that all these brackets line up and then you’re going to want want to find the four holes in the corners. Mark those holes on your body. You can use a Sharpie.

So, This Is The Moment of Truth.

Go ahead and drill this guy up. It does come with a drill stop. If you want, you can go ahead put the drill stop on here, so you don’t actually go through and hit your body. I’m going to go ahead and tighten this guy down on the drill bit and then we’ll just drill out these holes that we just marked. Okay then, you’re going to go ahead and locate the riv nuts. They also give you a little bit of grease to put on them because you are just going to kind of have to tap them in there slightly. They are kind of interference fit and then once you have it on the rivnut actually inside the Bronco tailgate you’ll take this little tool and kind of put it over the rib nut and then you’re going to go ahead and tighten down the screw with your Allen key. You’re going to do that until it’s nice and snug and doesn’t spin anymore.

You do not want to over tighten it ‘cuz it will spin and then it will be loose. So, it’s kind of finding that fine tuned spot for these.  All right, now we’re going to go ahead and start temporarily putting this stuff back in place. You can go ahead and put it in place but don’t fully start putting it together yet because we’re going to have to start putting some plastic washers and lock washers in certain areas. I went ahead and installed the three screws up top and the two screws and nuts on the side of the brackets because they do not require washers and it will hold it all in place from here on out.

You need to add some washers and it needs two of the black washers on the top two bolts that go into the riv nuts and then it’s going to use a lock ring on the outside to hold it all together. For the bottom set of bolts you’re going to use just one of the black washers in a lock ring except for the side that was loose, if you remember, I said that this side was loose you’re actually going to want to go ahead and you’re going to throw in the white washer in between the two parts so in between the loose part and the actual frame itself.

You will still put a washer on the back and a lock ring on the front but you will just include the little white washer. You’ll have two other white washers but those will be saved for the actual table once we install that. Okay, so now before you install this last bolt that goes into the rib nuts you’re actually going to want to install the table. That’s why it is detached so that it can flex out a little bit so that you can actually put the table in. You’ll notice these holes on the side of the table, you’re just going to go ahead put one of these washers on the little tab and you’re going on either side and then go ahead and slide the table on. You can take the little string for the table and hook it up into its respective hook. Once it’s on then we’ll go ahead and finish installing that last bolt.

All right, there is the Tuffy tailgate table for your 6th gen Bronco. I think it’s a nice table. It’s a quality build. It doesn’t rattle. I’ve been using it for the last few days and out here Off-road. It’s useful. You can put anything that you need on it. I’ve been using it to put like camping stuff and tools on top of and it’s a sweet little table. There you go, simple install, useful tool.
– Weekends & Waypoints

Convenience Is Key
Tuffy Cargo Security Drawer

Addressing the back end of the Bronco, this is the Tuffy Products drawer system. I’ve been needing something in the back of my Bronco to store like tools, spare parts like CV axles and whatnot so this is going to be a really nice thing to have in the back of the Bronco so stuff just isn’t flying around. I want to show you guys how this is installed and then I’ll give you guys my thoughts.

First step is we’re going to have to unbox it. The box is pretty big, it’s pretty heavy so let’s jump in the unboxing. So, we have the drawer system all taken out here and it comes pretty well put together with all the hardware and instructions inside of it. Locate all your hardware and keys to open it. It has a bar underneath just for shipping so we’re going to go ahead and take that off.

So, now we’re in the back of the Bronco. Looking at the nice detailed instructions we’re going to have to go ahead and take apart these Factory hooks that are in your trunk. It’s pretty simple to do you just kind of unhook the plastic and then we are going to unbolt these hooks. Once you have the hooks out, we’re just going to do that for all four corners.

Once you have all the factory hooks taken out of these spots, you’re going to go ahead and we’re going to screw the standoffs in. Doesn’t matter which way they go they’re the same on both sides. You do have to pay attention to which orientation they’re going to be in or which hole they’re going to be in so for the ones that are closest to the trunk you’re going to want have them facing forward and then in the rear you’re going to want to have them facing towards the trunk. You want both standoffs to be facing in board of the trunk and you’re only going to put one in each corner.

Now that you got the standoffs in we’re going to go ahead back to the drawer open it up. We’re going to take this drawer out so that we can get access to the bolts. To take it out you’re going to want to go ahead and push the release arms on both slides as you pull out and the drawer should just slide out.

Now that you have the drawer out, carefully pick it up and place it into the back of the Bronco. Then we’ll go ahead and try to line up these standoffs. Once you have the drawer system actually on top of the standoffs it’s kind of hard to see but the standoffs will go through holes up underneath the drawer system in all four corners. Take the nut and washer that come with them and you’re going to layer them up, install them and tighten them down. I promise, the standoff is sticking up underneath there and it’s going to be like that way in all four corners. The far ones you’re going to reach back up in there. Go ahead and tighten these up.

Next Step. You’re going to reuse the hooks that you took out of the floor of your trunk. The drawer has these nice spots right over here for them to be put back in with these screws. Go ahead and screw these guys into place. This way we have a nice place to tie stuff down with. Careful, don’t overtighten.

You can still get access to your under drawer storage, so if you ever wanted to you could just take the drawer out throw it on top or onto the ground and you can actually still get up underneath there and get to all your stuff that you want to have under there. It is going to be a little bit more difficult to get to it so I would only put stuff that you’re not going to use on a daily basis, like emergency stuff.

Go ahead and throw the drawer in and we’ll be done. Once the drawer is in it does take a little bit of finagling here with the side hinges you you do kind of need to finagle one side in and then the other side it might take two people to actually do it. Ours is a little tight uh but I think it should work out in the future. Maybe I just need to loosen up the bolts but it does work.

It does actually have here on the inside these nice dividers so you have a bunch of compartments that you could use for whatever you need. These ones actually bolted in over here which is nice. If you want to take them out, you just unbolt them. The drawer is felt lined on the bottom and seems pretty solid.

I’m going to load it up with a bunch of stuff and we should be good to go. All right, there we go. Pretty simple install for the Tuffy drawer system for the sixth gen Broncos. I think it’s pretty awesome I’ve been using it for a few days now. I’ve been cramming a bunch of stuff in it and it’s it’s working well. I mean you’re going to be able to put spare parts in there, tools, pretty much anything extra that you don’t want floating around. I used to just have a bunch of stuff floating around so it’s pretty nice to have somewhere to put it.

I have taken out the center slots and I’m just using three sections cuz I think that’s really all I need. I actually went ahead and put a little foam in there too, just to dampen any noise of loose stuff rattling around. You know I got some camera gear and whatnot in here. You don’t have to go ahead and put foam in here. It’s a really quiet system. Honestly, before that I just went ahead and did it more or less just to protect the metal and the coating a little bit. You know protect my stuff that’s in here.

It is felt lined on the bottom and this thing has some pretty sturdy rails. You’re not going to be able to push this thing down. This thing has a pretty heavy load rating, if I had to guess. It is lockable and it’s got a pretty stout locking system and latch. So, if you do want to lock it up, that is nice to have. You don’t really need to, in my opinion, because when it’s closed and your tailgate is locked it’s not like anyone can open it anyways but who knows. Maybe if you had the tailgate open and you want to show off some stuff, you’d want to have this locked and that’s an option. So yeah, there we go guys this is the Tuffy drawer system for the Ford Bronco.

-Weekends & Waypoints

Exploring Moab’s Stunning Scenery During Easter Jeep Safari | Mineral Bottom Trail

Apr 21, 2024


A winding shelf road, uranium mine, historical rock inscription, helicopters, goats, and an engine cooked burrito. The Gone-Gpn crew, four subscribers and friends from @Jeeptalkshow , @tuffyproductsofficial, @hopliteventuretreksoffroad2830, and @roamingreckless hit the trail for the third annual Gone-Gpn trail ride! For some of the crew Easter Jeep Safari can be a lot of work, guiding trails, teaching classes, filming, and photographing the Jeep Concepts.

The team trail ride is our time to relax, see the sights and put dirt under our tires. This year, Chris took the lead in his Expedicion De Las Americas CJ7 and guided the team down Mineral Bottom to a uranium mine, then deep in to Hell Roaring Canyon to see an 1836 rock inscription by Denis Julien. The trail was mild but the views were spectacular! Another Easter Jeep Safari for the books!

Tuffy Ford Under Seat Lock Box and Console Safe Review

Tuffy gets Jonathan’s take about the Ford Console Safe and Under Seat Lockbox installed in his Ford F150.

Hi, my name is Jonathan. I’m here to talk about a couple of really awesome products that I have installed in my truck. It’s a 2021 Ford F150 and I have two products made by Tuffy.

The first product is a center console safe. The second product is a rear seat storage safe that I have in the back of my truck. If I need to take it out of the back, it’s very easy to remove.

I keep usually rifles in there but if there is anything valuable I always lock that up as well. In the center console I keep a forty-five. When travelling, it’s just always nice to have because, one, I don’t want my kids to get involved and it gives me a ton of peace of mind with my kids.

I have three kids ranging from the age of nine to fourteen. They can always be curious. Even though I know they would never want to handle a firearm, it’s peace of mind for myself and my wife that we’ll never put them in danger.

Very high quality. You can tell that a lot of time and effort got put into designing it. A lot of time and effort got put into making the product.

It’s a great product. It’s extremely strong. It’s extremely durable. Definitely feel like it’s going to last the life of the vehicle and longer.

Tuffy Ford F150 Products

#ford #F150 #tuffyproducts #review #reviews #tuffysecurity #tuffyconsole #tuffysecurity

Tuffy Bronco Console Safe Review

Tuffy gets Eric’s take about the Bronco Console Safe installed in his Ford Bronco Sasquatch Edition.

Hi, my name is Eric. I’m here with my ’23 base sasquatch edition. One of the fun things about the Bronco‘s is all the accessories that you can put on it. One of my favorites is the console safe from Tuffy.

I typically put my sidearm. I use a 1911 and it fits in there perfectly but I also use it for, you know, everyday use.

One of the reasons I really love the console safe is because it has the 3-digit combo lock. I love that I can just walk away not having anything in my pockets or on my person. I can come back, put in the 3-digit combo and unlock it to have everything I need, right there, ready to go.

It’s just a phenomenal product. I’m not worried about anything when it’s in there. The build quality is excellent. I just absolutely love the product and I love the Bronco. It goes hand in hand and I’m super happy with it.

Tuffy Ford Bronco Products

Tuffy Bronco Console Safe

#fordbronco #tuffyproducts #review #reviews #tuffysecurity #tuffyconsole #tuffy

3rd Annual Go Topless event raises over $18,000 for charity

Thank you again for the generosity with our 3rd Annual Go Topless event, Tuffy’s donations were a big hit! I also wanted to forward some of the pictures from Saturday as we had over 450 Jeeps, Broncos, and classic Land Cruisers join us to raise over $18,000 for our charity. 

Thanks

Jenn

Keep Your Ram Rebel Organized With This Tuffy Floor Locking Storage Solution!

The Overland Channel

Do you own a Ram Rebel truck? If so, you know that it’s a great truck for off-roading and exploring the great outdoors. But what if you want to store valuables in your truck without worrying about them being stolen? That’s where Tuffy Floor Locking Storage comes in.

Tuffy Floor Locking Storage is a secure way to store your valuables in your Ram Rebel truck. It’s made of high-strength steel and features a secure locking mechanism. The storage is also hidden from view, so thieves won’t even know it’s there.

Tuffy Locking Floor Storage is easy to install and can be customized to fit your specific needs. It’s also available in a variety of colors to match your truck’s interior.

If you’re looking for a locking storage solution, Overland Channel reviewed the Tuffy Floor Locking Storage and it is a safe and secure way to store your valuables in your Ram Rebel truck, then Tuffy Locking Floor Storage is the perfect solution for you.

Horizon Brands Bronco and Tuffy Security

Come out see the original Ford Bronco storage products by Tuffy® in action at the Horizon Brands booth.

The Tuffy products are holding up fantastic! We’re always showing people how well they work for us, both in person and in some of our social content.

Our event schedule for the remainder of the year is below:

  • Big Bear Bronco Bash
  • Fiesta Island Bronco Meet
  • Ultra4 Racing Legends of the Fall
  • Sand Sport Super Show
  • Off-Road Expo

MATT M | MARKETING MANAGER

Horizon Brands, LLC.

ADC Solutions Offroad and Adventure, LLC.